
20 Mosaic Digital Artwork Styles For Wall Art Prints
Decorative mosaic art began in ancient Mesopotamia about three thousand years ago, and continues into the current day as a diverse and accessible art form. In todays world beautiful mosaic digital artworks can be created with computers and suitable software, and in this blog post, I give 20 examples of mosaic styles suitable for wall art in homes and offices.
Philip Preston
12 min read
Decorative mosaic art, using things like small pieces of stone, glass, or shell, began in ancient Mesopotamia about three thousand years ago, and has continued into current times as diverse and accessible art forms. While early types of mosaic decoration were limited to tiles of physical materials, in todays digital world beautiful mosaic artworks can be created with computers and suitable software. In this blog post, I show examples of my own digital mosaic artwork styles which may be of interest to others who would like to create mosaic styles of their own. I would note that this post is not intended as a tutorial on how to create the styles shown, but merely to indicate examples of what can be produced.
My own mosaic artworks are produced using three computer programs:
Stage 1 - Stable Diffusion - an AI text to image generator that is free to use and available in a number of different forms, many of which are website based, but I have always used Stable Diffusion through Automatic 1111, a web user interface which has the benefit of running directly from a user's desktop PC (subject to minimum technical specifications). I use this program to produce a starting 'base' portrait that mosaic styles can be applied to.
Stage 2 - Studio Artist 5.5 - as the name implies, this is a software program (no longer available for purchase) capable of producing many different style of artworks, and is particularly versatile for mosaics, coming with a large number of presets, which can be customised to produce different and unique versions of your own. This program is used to add mosaic effects to the start images produced with Stable Diffusion.
Stage 3 - ON1 PhotoRaw - is a photo editing program used for all finishing touches to my digital artworks, such as brightness, contrast, colour correction, effects, sharpness, and exporting to output files.
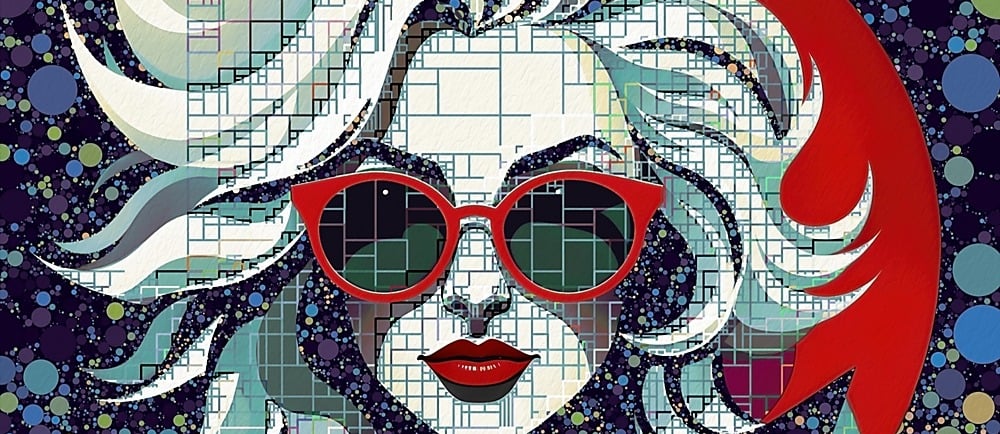
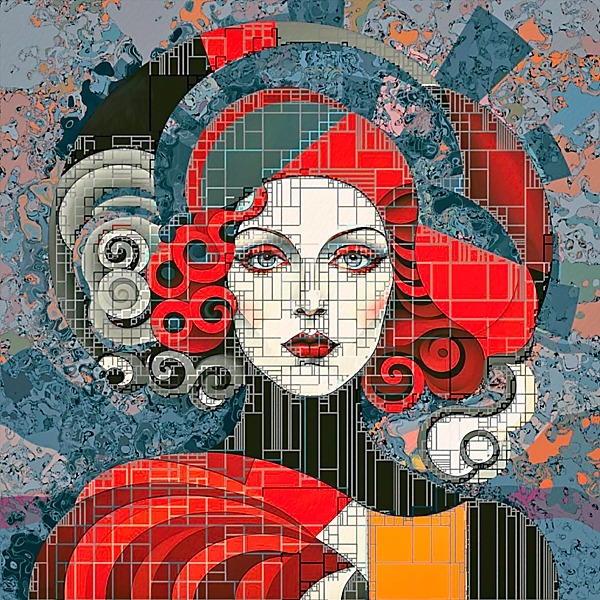
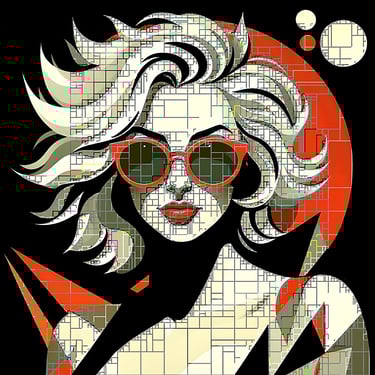
Example 2 - A single mosaic style preset used across the whole image, giving irregular non consistent size and shape rectangular tiles. Tile line colours are primarily based on image luminosity, with light coloured lines on dark image areas, and dark coloured lines on light image areas. The red areas of the original image have been changed for a more muted colour effect. No masking was required as the preset is applied to the whole image rather than specific areas, meaning this effect can be applied relatively quickly. The non uniform nature of the tile shapes works well for this type of image. This would be a good style to use for a series of same theme images, eg, portraits of people and animals, where the start image contains strong geometric shapes with high contrast dynamic range.
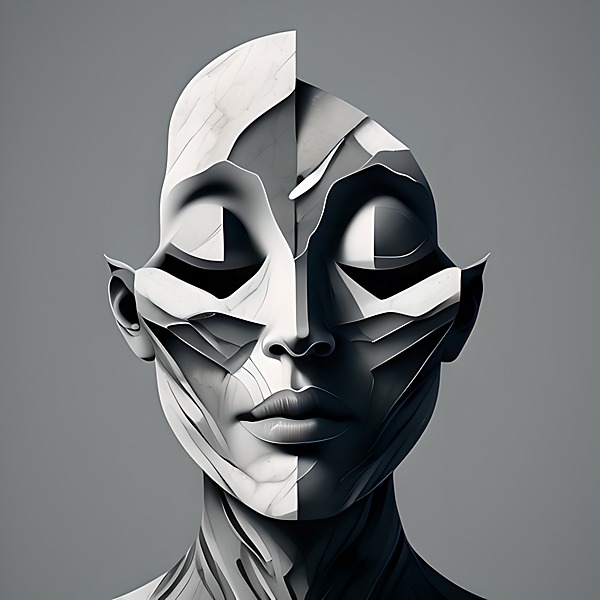
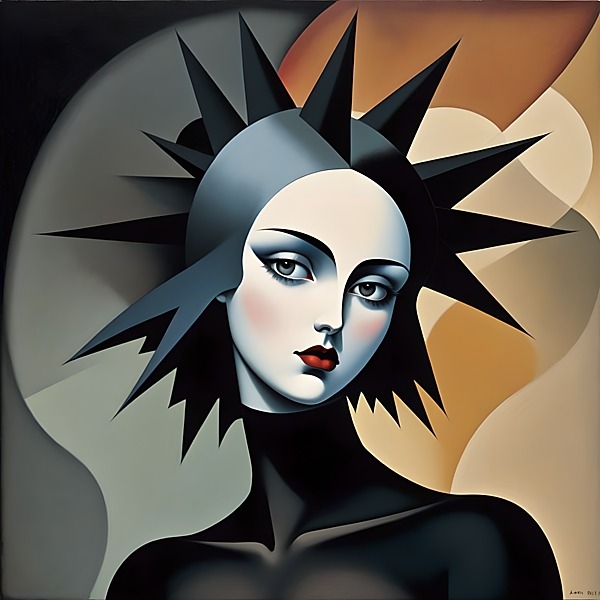


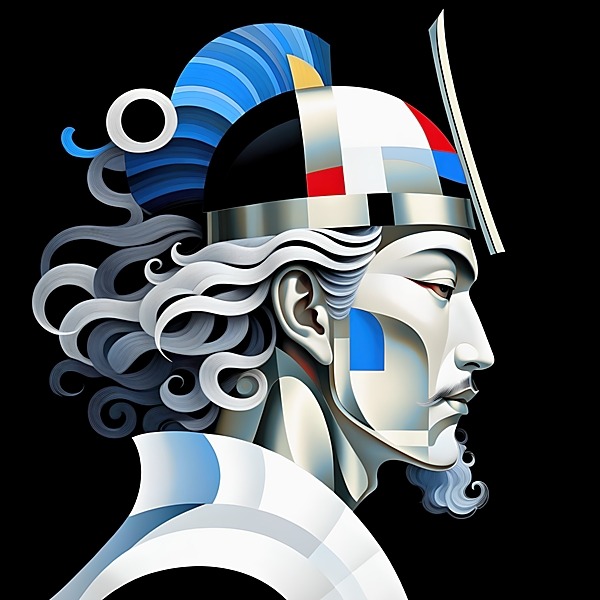
Example 18 - This image was originally produced as an abstract portrait, rather than a mosaic, but I think it has a mosaic quality about it. The image is essentially a series of non uniform squares and rectangles, that collectively produce a fragmented style portrait. A thin white outline has been added to pull the disparate elements together and show that this is a human portrait, with subtle black woodblock hatching applied to some areas of the image to supplement the white outline.
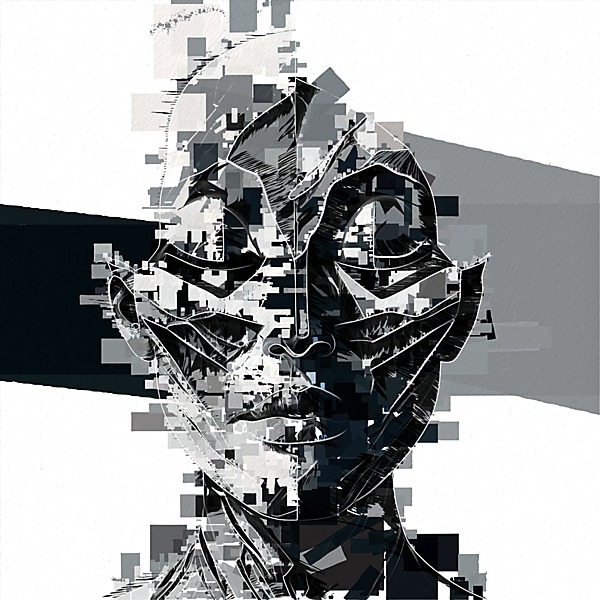
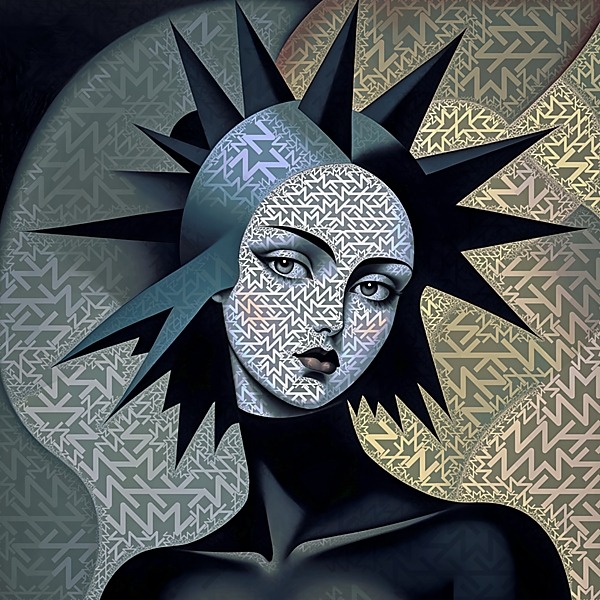
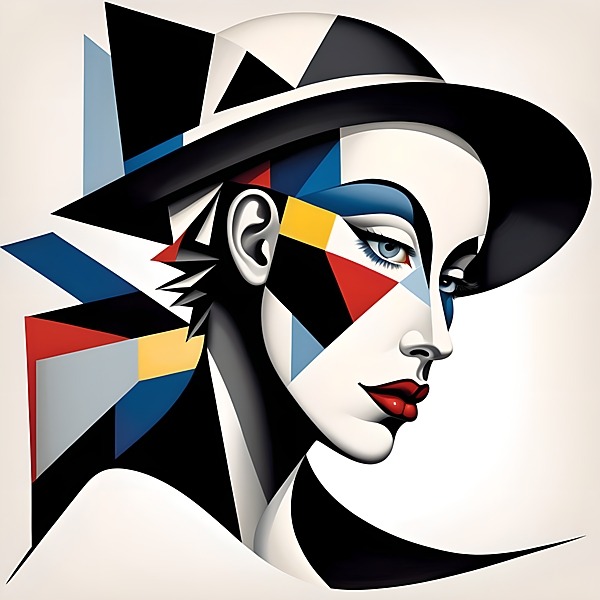
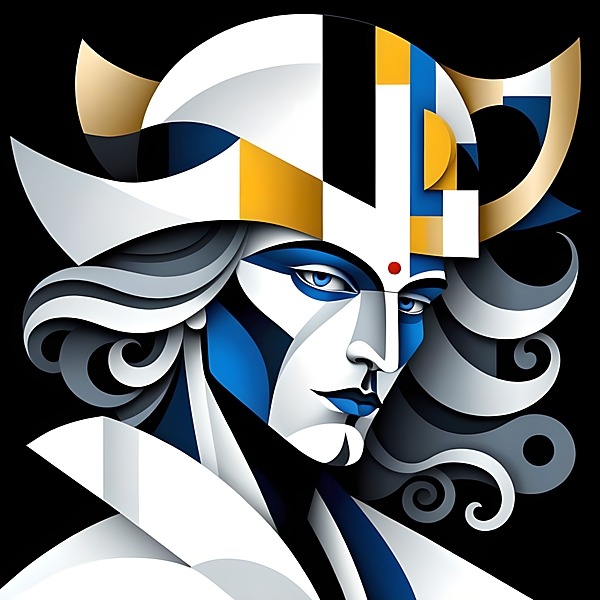
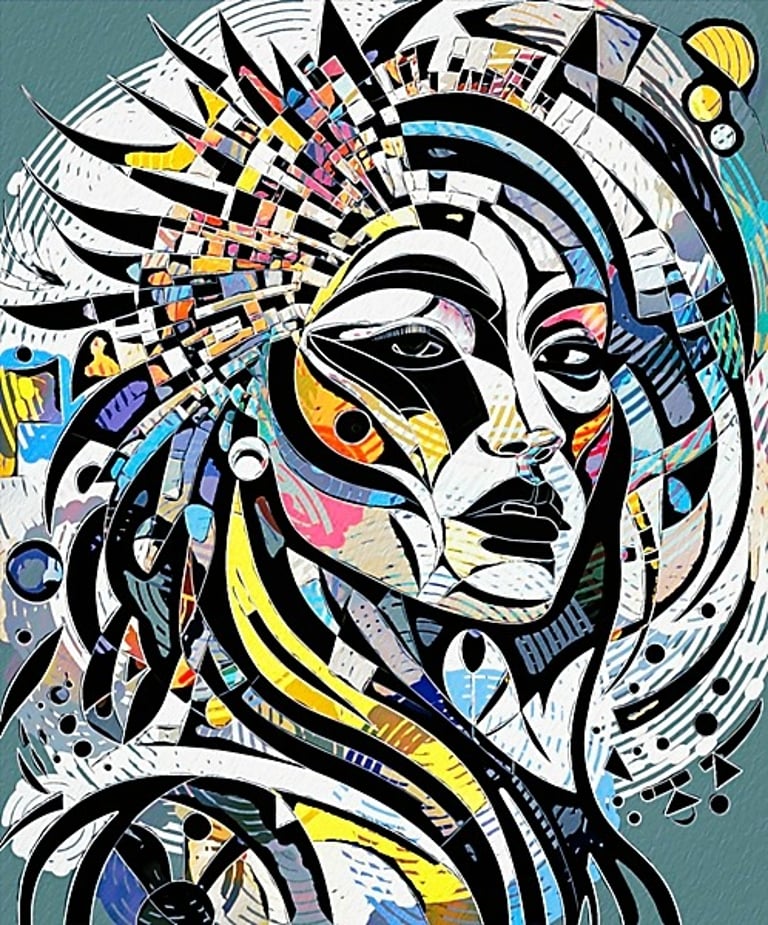
Example 19 - Like example 18 above, this image was originally produced as an abstract portrait, rather than a mosaic. It uses irregular vertical and horizontal geometric shapes primarily on the face areas, but is supplemented with woodcut hatching to provide further definition to the specific face regions such as eyes, nose, mouth and ears. Is this an example of mosaic style? Perhaps not, but worthy of consideration for more abstract style portraits.
Example 3 - This example uses a truchet tile pattern (tiles decorated with patterns that are not rotationally symmetric) across the whole image. Luminosity values were used in the layer blend mode to show tiles in highlight areas, but hidden in dark shadows. Time needs to be spent evaluating the applied size and density of the tiling pattern, basically, not too big or small, and not too dense or sparsely populated. For this example, a different and smaller size tile was used for the face, for greater density in that area, and colour in the mosaic version is derived from the original base image, although these could easily be changed for more colour variation.
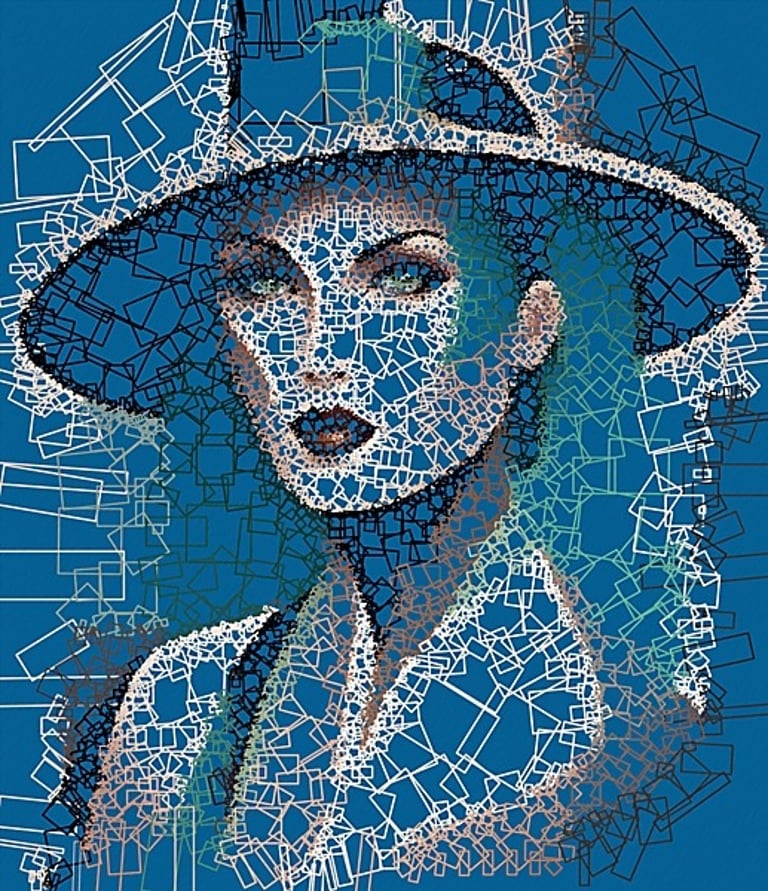
Example 4 - This tiling is essentially similar to example 2 above, but has a solid colour background, rather than gradient colours, and in this case dark blue. Again, luminosity values determine tile outline colours, with white lines where the original file has highlight areas, and black lines where the original file has dark shadow areas. Mid grey areas in the original produce coloured lines in the mosaic version. This style is relatively minimalistic in appearance, so a strong outline shape is important to give the mosaic version a clear structure.
Example 5 - A variation of example 4, with the same methodology, solid background colour, and luminosity values used for the white or black coloured tile outlines in the mosaic version. But this version uses a more complex and abstract tiling arrangement, with overlapping and random angled placements of individual tiles. Tiling overall is more dense than the previous example, and for small size thumbnails as shown below, may appear too dense, but viewed in a larger size looks much better, and impressive due to the complex arrangement of the tiling. No masking is required as the effect is applied to the whole image, so despite the apparent complexity, this is a relatively quick style to apply. As with the previous example, strength of colour and actual colour are important for the solid background, else the impact of the tiling arrangement might be less evident. A strong outline for structure in the final version is also important.
Example 6 - This is the same tiling method used for example 5, but instead of just a solid colour background, a suitable layer blending mode is used to allow underlying colours to show thorough in the mosaic version, in this example, shades of orange and blue. Complimentary or opposite colours of those in the original image would work well for the solid colour background. A thin black outline was added to the mosaic version to further help defining the face and geometric shapes in the image.
By single style, I mean a digital artwork produced using just one mosaic preset, either across the whole of the image or, with use of layers and masking, applied to selected areas only. Mosaics using two or more preset styles are discussed in a later section. For information and reference only, I show the original base image that each mosaic is derived from, with start images shown left, and final images shown right.
Single Style Mosaic Artworks
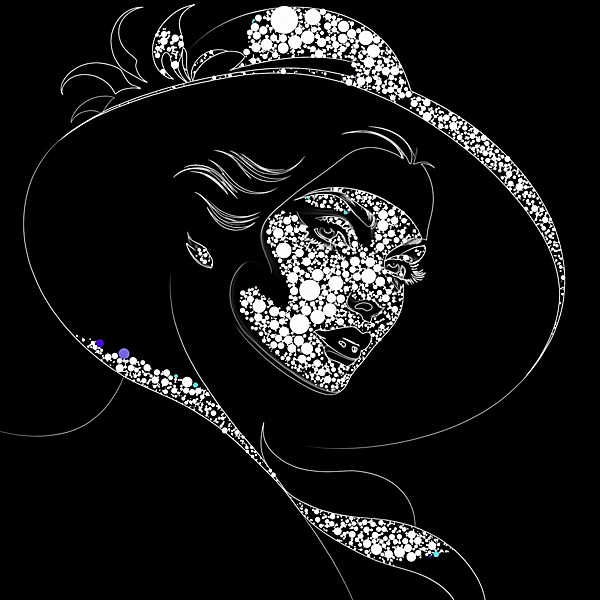
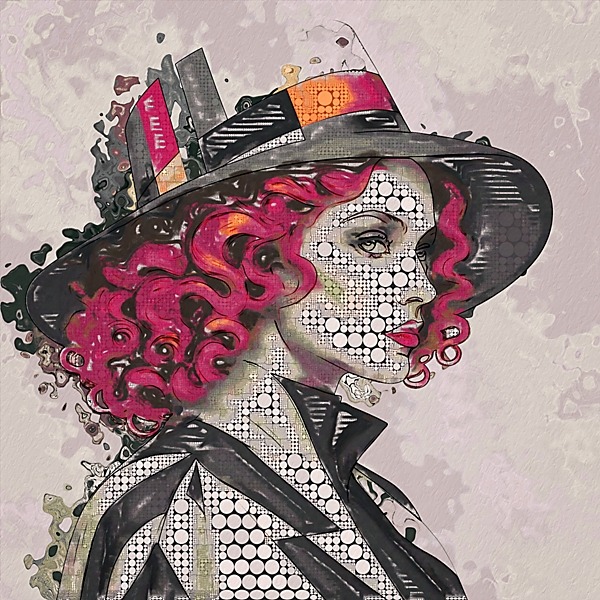
Example 7 - This example uses white irregular size circles as a single mosaic style, but the style is applied selectively using masking or layer blending mode to just highlight areas of the base image. A thin white outline has also been applied to the final mosaic version to add structure to the hat shape, face and hair. Overall, this provides a visually simpler style of mosaic best suited to base images with strong but simple geometric shapes, such as the hat, outline of the face, and a few minimalistic lines for the neck and shoulder regions. Different shape tiles for the highlight areas, such as triangles or rectangles, would work equally well. This type of style could also be reversed so that the mosaic tiles only show in the dark shadow regions, but personally, think this effect works better just with highlights.

Example 8 - Although this example uses just a single mosaic preset, the style is quite complex with circles inside squares, and the placement of individual tiles being a mix of right angles and angles aligned to the subject outline. The colour theme in the mosaic version uses monochromatic shades of blue, rather than colours appearing in the base image. The original image was produced as an example of stained glass mosaic artwork, hence the black outline between the different colours. The white highlight areas in the original have no or minimal tiling in the mosaic version, which helps visually to define the shape of the face and add a bit of 'breathing space' to the overall density of the tiling in the mosaic version.
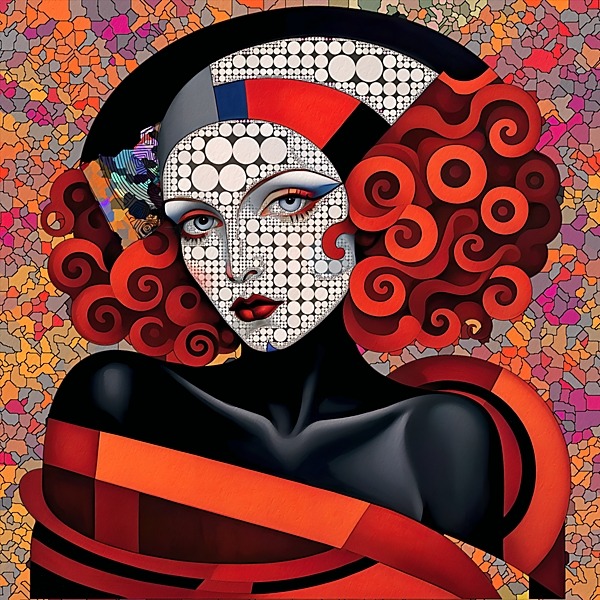
Example 9 - This example uses the same tiling as example 8, but covers the entire image, and uses the colour theme from the original base image. This gives a very dense and complex look to the mosaic version which is best appreciated when viewed as a large print, rather than the small thumbnail shown below, when all the complex details of the image are clearer. Colour scheme and tiling density are important to the success or otherwise of this style, and a start image with strong shapes will be helpful. While the final mosaic version has a unified colour theme across the image, some subtle colour separation between the face and background areas might help produce a better image. Also, consideration could be given to applying different shape density and complexity to the face and background, for example, making squares/circles bigger for the face than the background (or vice versa).
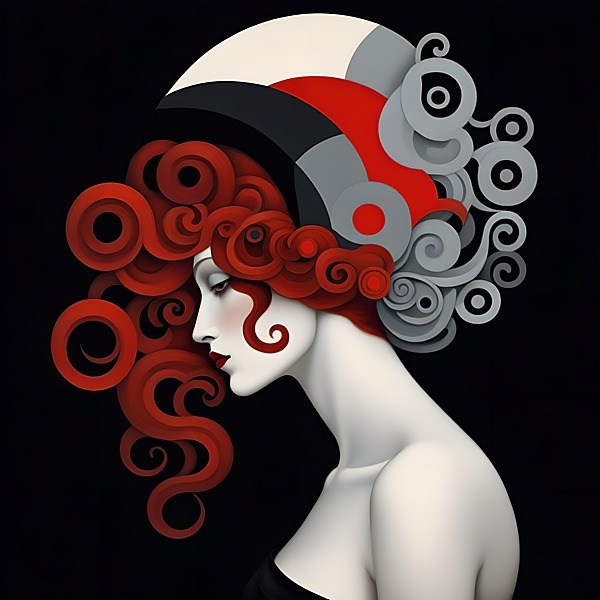
Example 11 - In complete contrast to the simpler style shown above, this style is very abstract in appearance, where the individual tiles are small blocks of random colour with a thin black outline added to clarify the shape of the face and hat among the abstract colour and shapes. This style is much better suited to large size prints where details are more easily discernible, compared to the small thumbnail version shown below. For smaller size images, the mosaic tiles in the black shadow areas of the original image could be more unified, or even left as is, to give clearer definition to the portrait features.
Two Or More Mixed Style Mosaic Images
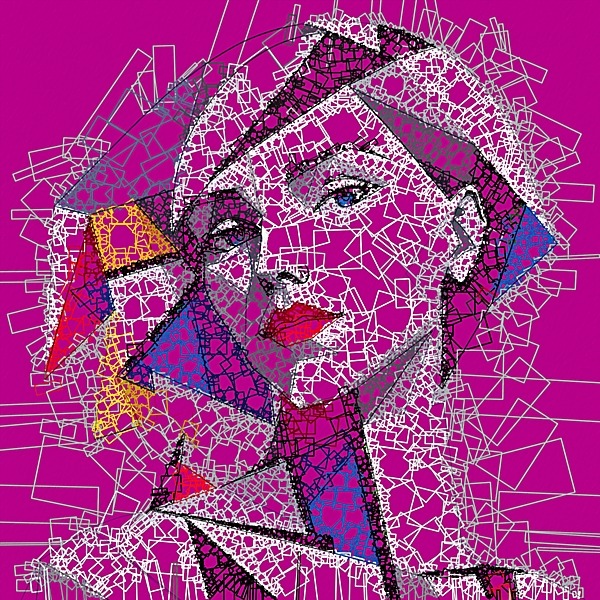
Example 12 - This example uses two mosaic styles, a truchet tile for the background and a close pack circle tile for the foreground portrait details. The black truchet tile works essentially as a frame for the portrait, while the close pack circles are mostly uniform in size, but using smaller sizes close to edges. These two tile types work well together, and are sufficiently different to give a pleasing combination in the mosaic version. The size of the close pack circles could perhaps be more varied to make them visually more interesting as a whole, or limit the circle size variation to just the face and neck areas, leaving those outside the face 'as is'. This example also works well because of the varied colours and geometric shapes in the hair, while a smaller colour range might mean the final image looks less effective.
Example 13 - In this example, the large red, orange and black colour segments already work effectively as individual mosaic tiles, so tiling has only been applied to the face/head and background areas. Variable size close pack circles are used on the face, and very small complimentary multi coloured tiles are used for the background. For anyone using Studio Artist 5.5, the small background tiles were created using one of the 'Geodesic' presets, which breaks up large colour blocks into smaller fragments seen in the background here. The small size of these tile fragments also contrast nicely with the larger red, orange and black colour segments helping the larger colour blocks stand out more in the final mosaic.
Example 14 - This example uses the style shown in version 8 and 9 above, a mix of variable size and colour squares with circles inside them, displayed either as rigid right angles, or aligned to the outline shape of the portrait features. In addition, a 'textured spray' effect layer has been applied to the entire image, which creates a nice soft effect that complements the mosaic tiles, although will be seen more clearly on larger versions of the final mosaic.
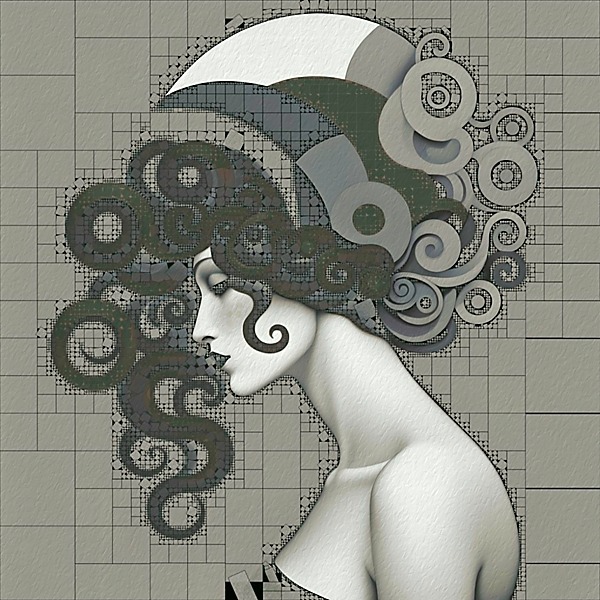
Example 15 - This example has a monochrome finish, and its tiling is similar to the previous example, but instead of adding a textured effect to the final version, a 'displacement effect' is applied and shows on the left hand side of the image outline as a marble effect abstract finish. These effects have not been applied to the horizontal strands of hair below the hat, and the banded segments at the rear of the hat, as these act individually as mosaic tiles in their own right, and create a mix of varied visual interest in the final version.
Example 17 - This example combines the irregular geometric rectangles style mentioned above, with the displacement marble effect abstract used for the background areas, creating a rich textured look for the mosaic as a whole.
Example 10 - This style uses a simplified version of the two examples above, but has larger right angle aligned tiles for larger blocks of background colour, while tiles close to the portrait outline are smaller in size and angled in a non consistent and non symmetrical manner. But the main difference here is the absence of tiles from the portraits face, neck and shoulder areas, where a slight canvas texture effect has been added. Overall, this colour scheme and tiling effect gives a much more subtle look to the final mosaic version, compared to the strong colours in the example above.
Example 16 - This version only uses a single mosaic style, namely close pack circles, but is incorporated into an image with a 'paint effect', so is classified as a mosaic with two or more styles. As a style it appears to work successfully, and the clearly defined circles contrast well with textured areas like the hair, hat and background. Potentially, a style worth investigating more for future work.
Example 1 - A simple style monochrome mosaic preset with diamond shaped tiles applied across the whole image. The greyscale colour is determined by the layer blending mode used, while tile density is determined by Studio Artist settings. Similar style tiles based on rectangles and triangles work in the same way as this example. This works best when used with start images that have strong shapes and outlines, and possibly looks best when applied to greyscale images, rather than colour ones, although both are possible.

Not Really Mosaic Style - But Perhaps?
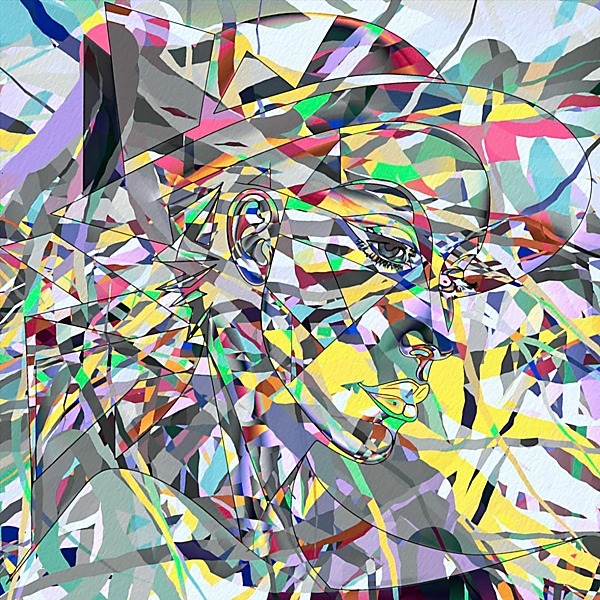
All examples shown below use two or more tile effects combined together in the final mosaic version, which involves creating masks for the relevant areas to limit where the tile effect is applied. For anyone unfamiliar with masking and layers in image editing software, I have shown an example from a typical digital mosaic artwork involving layers and masking. If you click on each of the 'process' images from left to right, you will see each stage in the process from start to finish used to create the final mosaic version.


Example process stages from start to finish
Starting from the AI generated base image, a total of 8 steps were used to arrive at the final version of this mosaic artwork, these were:
The AI generated start image (top row, first image).
Irregular rectangle tiling applied to the whole image (top row second image)
Masking used to delete tiling from the black background (top row third image)
Masking used to apply close pack circles to the black background (top row fourth image)
Masking used to change close pack circles colour from grey to blue (bottom row, first image)
Masking used to change hair and face colours (bottom row second image)
Masking used to delete new colours from the red background shapes (bottom row, third image)
Subtle canvas texture added to the entire image (bottom row fourth image)
When the final stage is completed, a digital file would be saved to store and use for suitable print versions.
For this example, the start image is shown left, while the finished image is shown on the right. You can click each of these to view a larger version of the image. In my opinion, mosaic artworks look best when viewed as larger sizes when all the detail and complexity can be better seen, but the lower resolution images below are sufficient to show changes from the start to final versions.
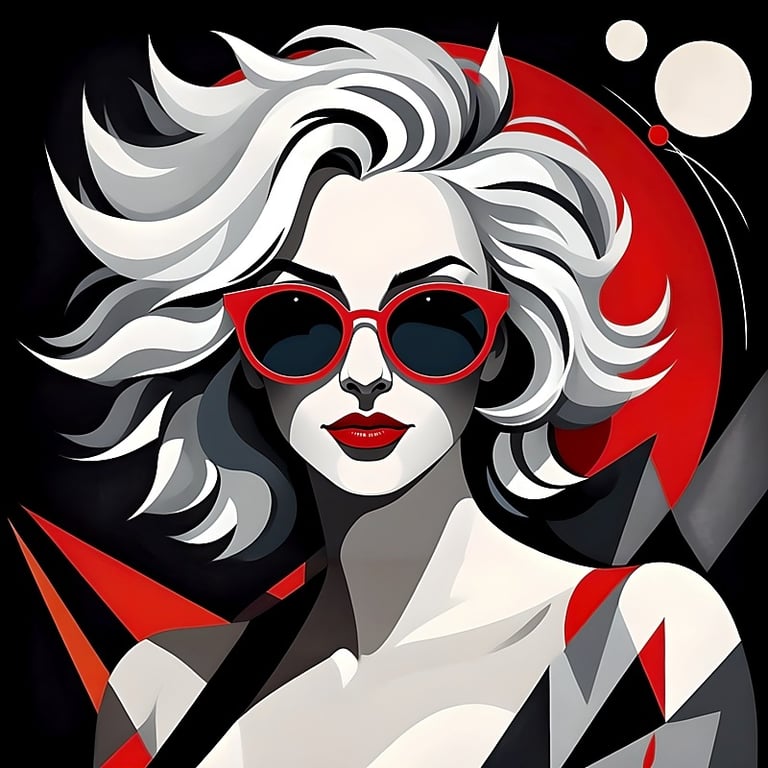

To start the process I use Stable Diffusion / Automatic 1111 to create a base image. If you happen to use Automatic 1111 and would like to try and replicate the base image, or produce something similar, the actual parameters I used are shown below.
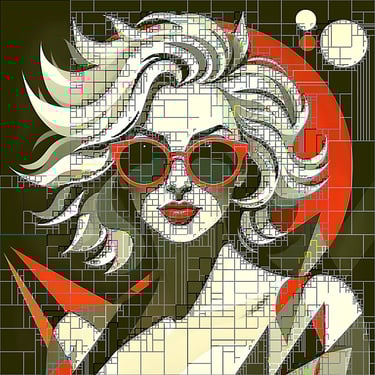
Parameters - Text prompt: "Cubist artwork beautiful rock chick woman wearing sunglasses, detailed spiky sine wave intersecting lines messy silver hair, red lips, complex abstract geometric shapes, kandinsky and bauhaus art styles, muted colours, black background with white circle, clean vector illustration artwork, high definition, highly detailed, sharp . Geometric shapes, abstract, innovative, revolutionary".
Steps: 20, Sampler: Euler a, Schedule type: Automatic, CFG scale: 5, Seed: 2896633328, Size: 1024x1024, Model: artium_v20,
Negative prompt: anime, photorealistic, 35mm film, deformed, glitch, low contrast, noisy
For mosaic style artworks, I generally like using AI images that have strong geometric shapes, such as circles and rectangles, and high contrast with a limited range of colours, as these produce the type of images I like to work with. If the created base image has shadow areas that are not very dark, I find it helpful to increase contrast levels even higher with an image editor, as this can help with making better and more accurate masks for applying mosaic effects to just specific parts of an image.
Mosaics With Two Or More Mixed Styles
In Conclusion.
This post has shown mosaic style digital artworks need not be limited to styles seen with physical material mosaics, but that a range of styles from simple to complex can be done with suitable programs. The examples shown above are not intended as an exhaustive list of possibilities, as there are many additional styles that could done but are not shown here. These examples can be treated as a starting point though for further exploration into the fascinating and beautiful world of digital mosaics.
Over the coming 12 months, my own intention is to try and explore photo mosaics, and icon mosaics, both of which can produce beautiful results. I will update this blog post accordingly with any new developments on these topics. In the meantime, I hope this blog post has been informative and helpful to your own journey with creating mosaic artworks.
You are welcome to comment on anything about this post in the comments section below.
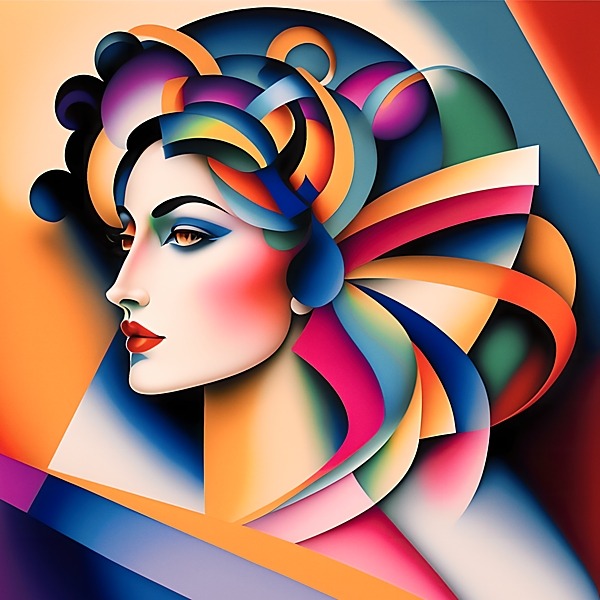
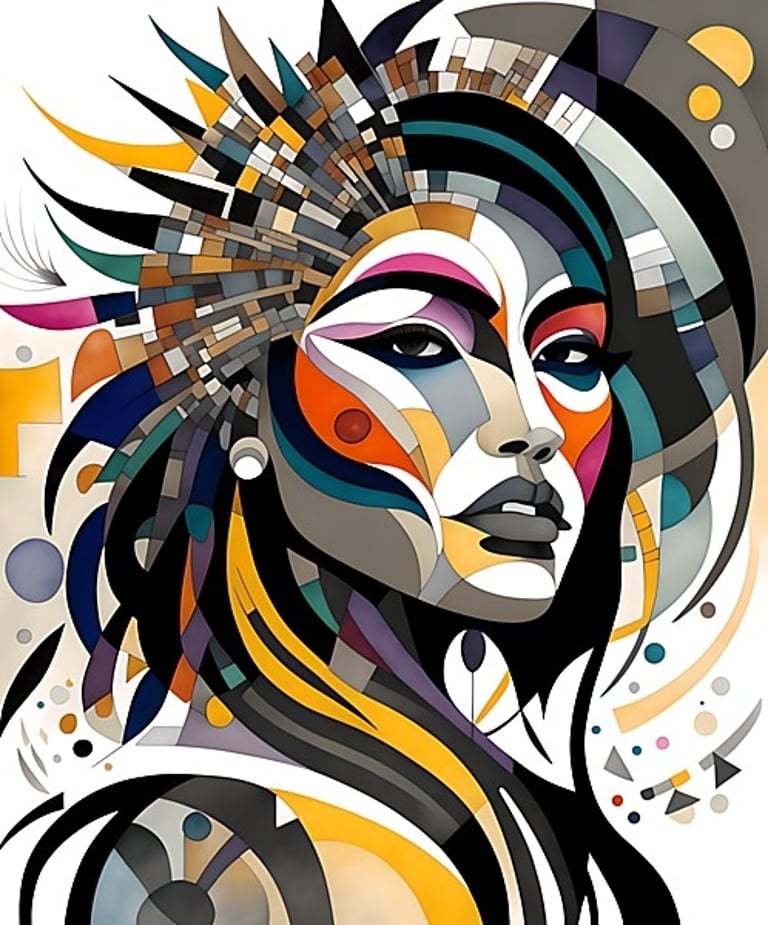
Example 20 - Personally, I think this example is more mosaic in style than the previous two examples, with the black outline shapes used to define the portraits features, such as head, face and headdress, being the actual mosaic tiles. The background areas, while not typically looking mosaic like, could be considered as mosaic tile fragments that supplement the main black outline tiles, building the image overall into a rich tapestry of shapes and colour.
All the above examples are available as wall art prints from my Fine Art America / Pixels store. Click the button to explore 200+ mosaic artworks available as posters, framed, canvas, acrylic and metal prints, ideal for your home and office wall art requirements.
Click on any of the images below to see a larger version. Note: if viewing on a large monitor such as a desktop PC, this gallery shows enlarged images full screen size which will probably be much larger than the native pixel dimensions of the uploaded files, this may result in images looking unsharp. If you view the images below from left to right, starting on the top row, you will see various stages in producing the final mosaic, you can cross reference each image with the list below for some basic information.
© Copyright Notice
All images copyright Philip Preston photography and digital art. No images by Philip Preston are in the public domain and must not be copied or used for any purpose unless agreed in advance. Use the Contact Form on this website for any enquiries about usage.